commercetools Integrations
This document outlines a possible example of how to integrate SheerID into a commercetools ecommerce project.
Overview
This is a lightweight demo showcasing the ease of integrating SheerID with a commercetools website. As every commercetools site is unique, the demo is not meant to give a feature-complete solution integrating SheerID verification into an existing commercetools website, but to give ideas on how to approach the task and raise questions. The provided frontend code is of no value apart from showing the successful verification, the bridge code is not meant to be used in production, but will help in understanding the integration.
The frontend demo code is using Sunrise SPA, a simplified single page application demo system from commercetools. There is no session management implemented, so certain edge cases are not handled in the demo, for example logging out. We have chosen to showcase the integration with this frontend code to minimise the amount of code to read through.
Ways to integrate with SheerID
There are at least three scenarios for the customer verification journey:
- Give code to the consumer on success / Send code to the consumer via email
- Apply code to shopping session (visible or invisible)
- Send verified signal to the merchant and use the verified status freely
The demo is implementing the second and third scenario. The first scenario is the easiest to implement, but the consumer needs to enter the code manually.
The second scenario is the most complex to implement from the frontend perspective (we are greatly simplifying, and not handling every edge cases either in the demo), the consumer does not need to enter the code manually, providing the best customer experience for discounts.
The third scenario is giving the most freedom, as it can be used to implement integration with any third-party systems and there is no limitation on how the verified customer data can be utilized, stored and reused.
Demo Architecture
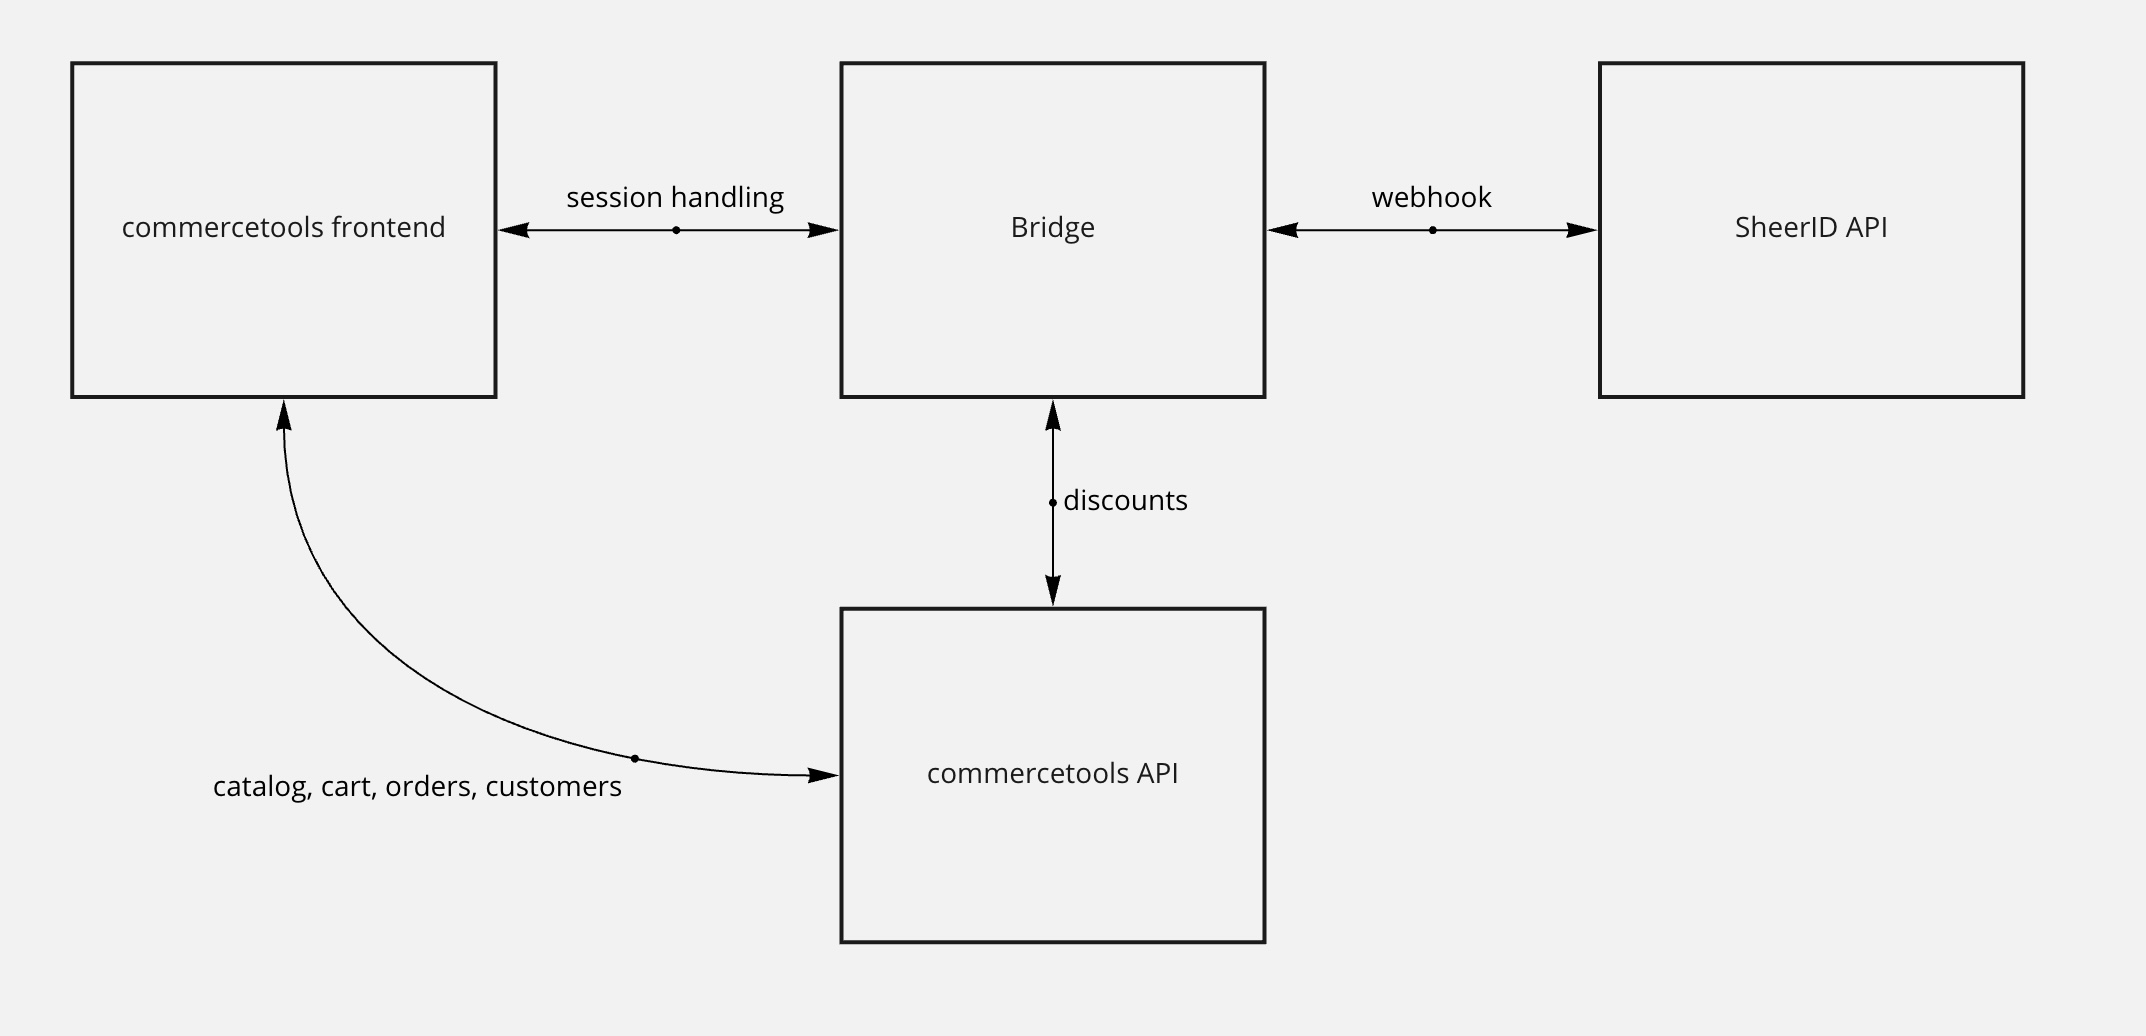
The demo consists of two parts, a frontend and a bridge app, connecting to SheerID and commercetools APIs. The frontend is a Sunrise SPA application, the bridge application is written in javascript.
Commercetools Frontend
The simple frontend demo is built from SUNRISE SPA, a simple SPA demo from commercetools (GitHub link) showcasing the simplicity of creating an SPA ecommerce store.
We have made only a few changes to the demo frontend code:
- replaced the navigation bar to reduce the need of catalog management
- added footer links (they are not really links, see below) pointing to the SheerID verification forms: as of best practice, we advise having a link in the footer to the verification form
- added links to the banners pointing to the same verification forms
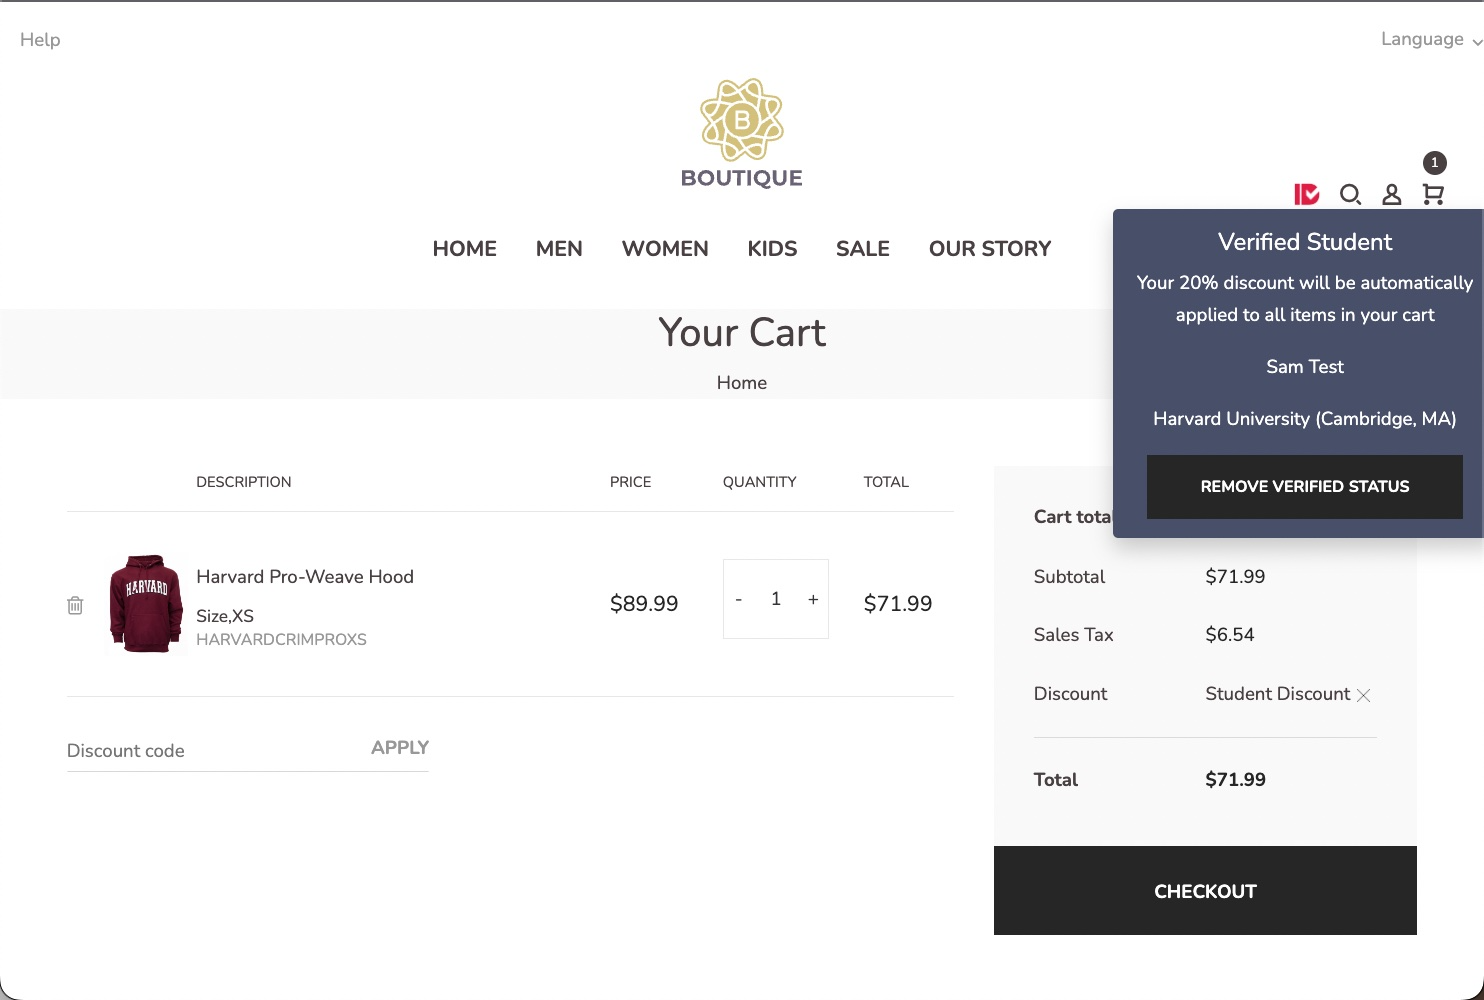
- added a verified dropdown in the header, showing verified status, name and organization: this is to show the success of the verification process and showcase using the provided data, it’s not necessary to implement but shows the possibility of adding personalized content to the website based on the verified status
- minicart messaging showing the verification success
- javascript code saving the verification data into localStorage: as there is no session handling implemented in the SUNRISE SPA demo this is the most convenient way to store the verification data for page reloads
- javascript code refreshing the cart after the verification success
- handling logged in customers (sending customerId as verification form metadata)
- handling login after verification success (updating the customer with the verified data)
Implementation details
The footer link is creating a random key, session identifier would be used on other frontends. This key is used in the verification form URL as metadata, identifying the frontend session. A simple background process starts in the browser at the same time, polling the bridge with the same key regularly, and waiting for the SheerID webhook to return to the bridge application with verification success. For the demo, we are using a simple polling mechanism, in production a more sophisticated solution would be preferred. Note for example that there is no error handling implemented in the demo, so if the verification fails the frontend will not be notified, still polling the bridge application.
Frontend changes
The modified frontend code is publicly available on the SheerID github: https://github.com/sheerid/commercetools-demo-frontend
Bridge application
The bridge is a simple node.js-based server, accepting requests from the frontend and webhooks from SheerID verification API.
The bridge application’s code is publicly available on the SheerID github: https://github.com/sheerid/commercetools-bridge
On calling the success-webhook endpoint, the bridge application is:
- getting the verification details from SheerID
- saving the verification details into Redis to be used by the frontend (verify endpoint)
- handling login event
- updating the customer in commercetools with the verified data (if the customer is logged in)
The customer is updated in commercetools by creating a custom field (after creating a type) on the customer object, containing the verification id, the verified community’s name and the organization name. The implementation is not using the commercetools javascript framework, but calls the commercetools API directly. This is to keep the implementation details visible, not hiding behind calls.
Bridge endpoints
Endpoints used in the current demo:
/api/success-webhookendpoint receiving SheerID verification webhook/api/updateregister current cart into Redis with session key/api/verifyfrontend endpoint checking verification status
Unused endpoints, containing untested or not necessary code and hints how to extend the functionality of both systems:
/just a holding page/api/create-webhookexample, how to use SheerID API to automatically create the webhook/api/cart-discountsexample, how to list commercetools cart discounts/api/getcartsexample, getting a list of open carts from commercetools API/api/webhookexample, creating cart discount using commercetools API
SheerID API
The bridge application is using SheerID API and webhooks. The demo is using the verification in test mode, so no real verification is done, but the verification process is fully functional, always returning with success.
commercetools API
The commercetools backend is serving the SUNRISE SPA frontend, and through the admin API, calls the bridge.
The bridge is using the commercetools API to:
- create cart discount codes for a given cart discount (coming from ENV variable)
- update customer data (account tagging)
- update cart data (discount code)
Requirements
Running this example requires:
- a commercetools website, access to Merchant Center with a user that has access to the Settings > Developer settings > API keys
- a SheerID account, with API access turned on in account privileges (open users list, select the user, even yourself, and turn on API access)
- computer with node.js v16 or not much higher (should work from v10 and with recent versions but no guarantees)
Frontend build
You need to install the dependencies with yarn install --frozen-lockfile, and then you can start the project with yarn start.
If you want to use the default merchant center project there is no need to add a .env file, if you want to connect to your merchant center project you need to set this up
Add the following environment variables to the .env file:
VUE_APP_STUDENT_PROGRAM=<here paste your student program's ID from my.sheerid.com dashboard - this is the on-page verification form acessible from /student-offer >
VUE_APP_MILITARY_PROGRAM=<here paste your military program's ID from my.sheerid.com dashboard - this is the on-page verification form acessible from /military-offer >
VUE_APP_STUDENT_LANDING=<here paste your student program's ID from my.sheerid.com dashboard - this is the SheerID-hosted landing page accessible from the footer >
VUE_APP_MILITARY_LANDING=<here paste your military program's ID from my.sheerid.com dashboard - this is the SheerID-hosted landing page  accessible from the footer >
VUE_APP_FIRST_RESPONDER_LANDING=<here paste your first responder program's ID from my.sheerid.com dashboard - this is the SheerID-hosted landing page accessible from the footer >
An example of the .env file:
VUE_APP_CT_PROJECT_KEY=sheerid-demo-system
VUE_APP_CT_CLIENT_ID=***redacted***
VUE_APP_CT_CLIENT_SECRET=***redacted***
VUE_APP_CT_SCOPE=manage_my_business_units:sheerid-demo-system manage_my_quote_requests:sheerid-demo-system manage_my_payments:sheerid-demo-system view_categories:sheerid-demo-system manage_my_quotes:sheerid-demo-system manage_my_profile:sheerid-demo-system manage_my_shopping_lists:sheerid-demo-system manage_my_orders:sheerid-demo-system create_anonymous_token:sheerid-demo-system view_published_products:sheerid-demo-system
VUE_APP_CT_AUTH_HOST=https://auth.europe-west1.gcp.commercetools.com
VUE_APP_CT_API_HOST=https://api.europe-west1.gcp.commercetools.com
VUE_APP_STUDENT_PROGRAM=637f7bbaf480e206ab93f7ba
VUE_APP_MILITARY_PROGRAM=637fa2ecf480e206ab9717f5
VUE_APP_STUDENT_LANDING=63f7786b7cbb357dd768a349
VUE_APP_MILITARY_LANDING=63f39b22007d1e73de95c390
VUE_APP_FIRST_RESPONDER_LANDING=63fcf49b476d765333e50cfc
Development/testing
Run the frontend with the following command:
yarn start
Build instructions for deployment
To generate a static version of the frontend, run the following command:
yarn build
and copy the generated dist folder to the server. Serve it from an S3 bucket + CloudFlare, nginx, or any other preferred method. Please note that to allow landing pages (browser refresh) to work, you need to configure your server to serve the index.html file for all requests that are not for existing static files (for example as a custom error document).
Installation
Preparation, this process does not install anything outside of the cloned folder.
- clone the repository to your local machine
- run
yarnornpm installto install the dependencies
Bridge application deployment
How to use:
- Create a commercetools API client in Merchant Center > Settings > Developer settings > API clients
- The scope can be “Admin client” (not recommended) or “Manage” Cart discounts and Discount codes
- Download the created API client’s “Environment variables (.env)” file before closing the popup
- Add the .env file to the project root
- Log in to your SheerID Dashboard
- Create a SheerID program, that you will use e.g. “Student discount”
- Configure your program with eligibility, theme etc
- Set the Codes section to “No Code”
- In Program Settings
- set Webhook for eligible verification to
https://<your_server_address>/api/success-webhook - add cartid as Campaign Metadata field
- set Webhook for eligible verification to
- Copy the access token from Settings > Access Tokens page
- Edit the downloaded .env file and based on the provided
.env.examplefile, add relevant information about your setup, for example:SHEERID_TOKEN=<your copied SheerID Access Token> SHEERID_API_URL=https://services.sheerid.com/rest/v2/ URL=https://www.yourwebsite.com/ PORT=8080 REDIS_HOST=localhost REDIS_PORT=6379 - If you are changing the port, make sure to update the webhook URL in SheerID Dashboard and if you are using Docker or Kubernetes, make sure to update the port in Dockerfile and your deployment files
- Run
node server.jsoryarn serverto run the bridge application. - Check that the bridge is running by visiting the server URL indicated by the application.
Troubleshooting
- If you are getting no such verification error, check that you have the correct SheerID Access Token in your bridge’s .env file
Further Reading, Links
Sunrise CommerceTools demo data

