Account Linking
In this guide, we’ll go through the steps to link a SheerID verification to your ecommerce platform using a webhook and our REST API, creating asynchronous communication with your CRM and a seamless user experience.
Overview
SheerID’s account linking strategy synchronizes verification data with your customer database and provides successfully verified customers access to their discounts/rewards without the use of promo codes. This guide will take you through the required steps in MySheerID to enable an account linking strategy.
Recommended Approach
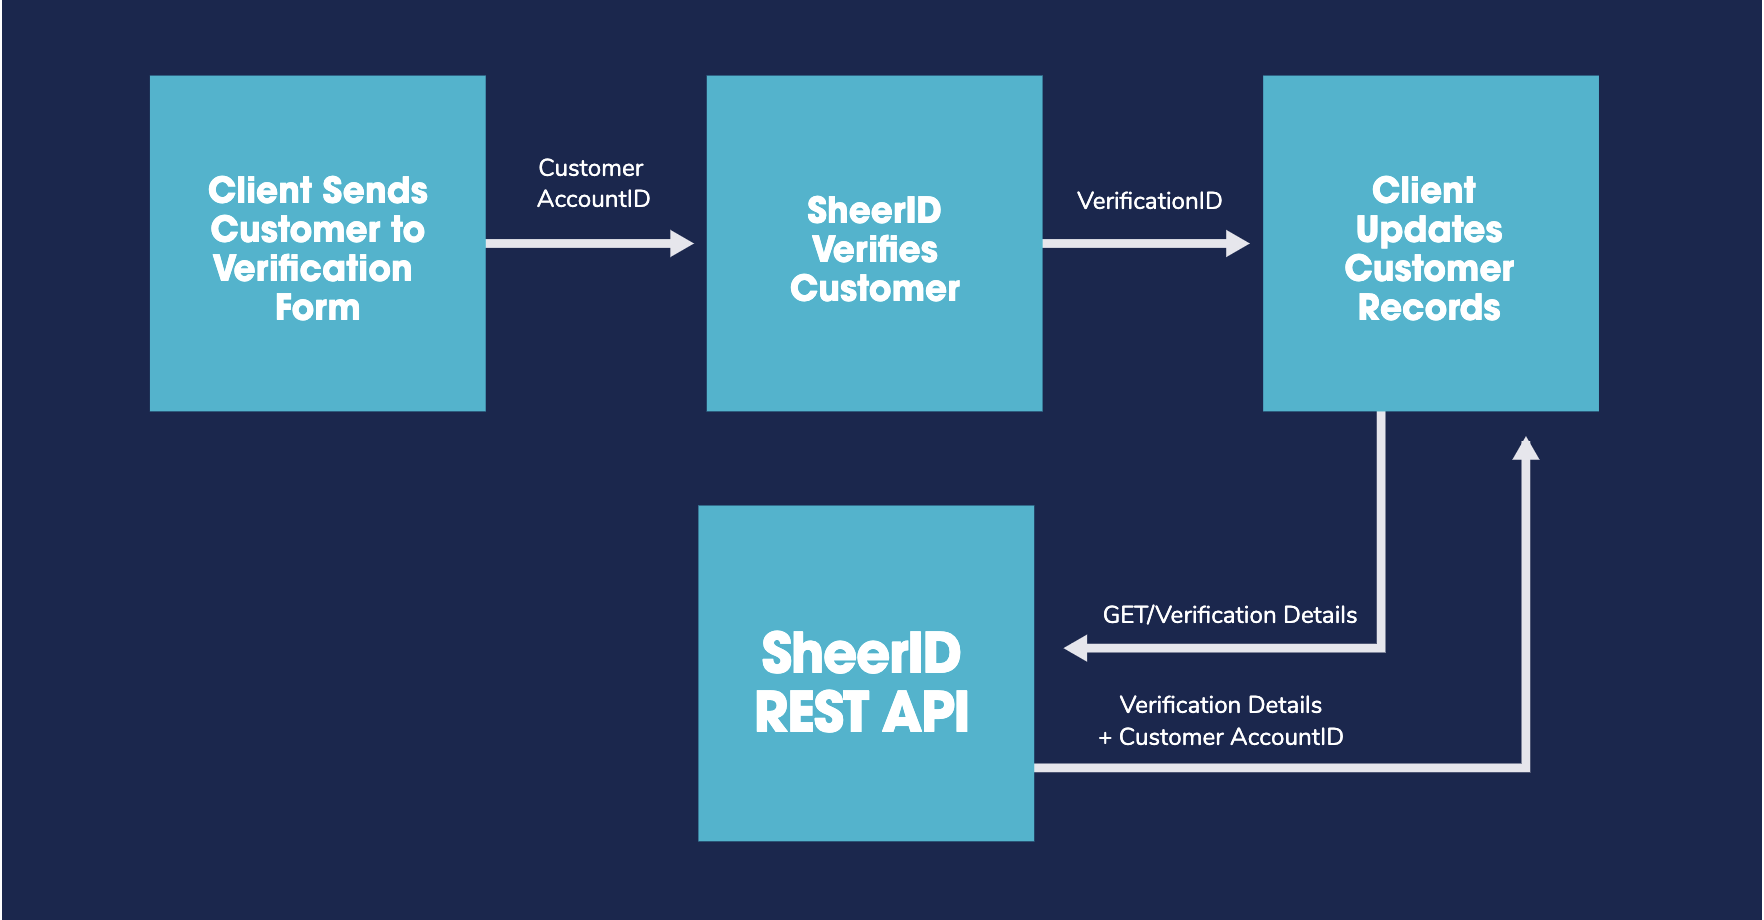
There are a few ways to link accounts, but the most common one involves leveraging your customer account ID. It’s easy and reliable. Here’s how it works:
- Your customer creates or logs into their account on your platform.
- Your platform calls SheerID to create a
verificationID. - Once verification is complete, SheerID triggers a webhook to your platform.
- Your platform hits SheerID’s REST endpoint to confirm the verification is legitimate and to pull any desired details.
Requirements
In order to link accounts using the recommended approach, you must be able to:
- Identify your customer accounts prior to calling SheerID.
- Store information about the verification before the verification is complete.
- Receive HTTPS calls from SheerID to an endpoint you control, i.e., a webhook on verification success.
Set Up Account Linking
In order to enable an account linking reward strategy that you can build into your customer journey, we will make some changes to your program settings. Once these steps are complete, you will have:
- Removed all references to reward codes in your settings and copy
- Added a webhook URL where SheerID will
POSTuserverificationIds when available - Optionally added a metadata key to your program for campaign management purposes
- Log in to MySheerID and select your program from the My Programs page.
- Click the Codes tab in the top navigation and select the No Code promo code type.
- Now click the Text tab in the top navigation, and in the Approved step section, update the messaging displayed to the consumer to remove mention of discount codes. Be clear about what action they need to take to redeem the discount, e.g., “Click the button below to redeem.”
- Add a redirect URL and corresponding button text to send your customer to your post-verification landing page.
- Click Settings in top navigation and find the Webhooks setting card. Enter your webhook URL in the provided field. Now, when a successful verification occurs for your program, SheerID will
POSTthe associated verfication ID to this URL in JSON format, e.g.,{"verificationId": "6295252c9a977557092883b7"}. - Now find the Emails program setting and update the messaging in the Approved email notifier to remove mention of discount codes.
- Now find the Campaign and Metadata Options setting, and define the customer identifier you wish to pass to SheerID when you load verification form. If you’re following our best practice of first prompting your customers to log in to (or create) an account on your website before verifying, then set this key to required. The unique customer identifier will then be saved as metadata on the verification record, enabling you to know which customer record to update upon verification success.
With the above settings in place, you or your developer can now write the code within your web services to complete the linking process.
Learn More
- To view a detailed representation of the account linking information flow, see our Account Linking Flow Diagram.
- To learn more about webhooks and our REST API, see our Creating Webhooks and API Walkthrough tutorials.
